Introduction To Angular Modules
In this article, we will learn about Angular Modules. Components, Templates, Directives, Pipes, and Services are the building blocks of Angular Applications. To make a complete application, we need a lot of these pieces. Managing these blocks becomes more complex as the application develops in size. Angular provides a simple and effective approach to organizing these chunks using Angular modules (Also known as ngModule).
Components, Templates, Directives, Pipes, and Services are the building blocks of Angular Applications. To make a complete application, we need a lot of these pieces. Managing these blocks becomes more complex as the application develops in size. Angular provides a simple and effective approach to organizing these chunks using Angular modules (Also known as ngModule).
What is Angular Module
The Angular module (also known as ngModule) aids in the organization of application components into functional units. Each block focuses on offering a specific feature or capability.
A specific feature must be implemented in the Angular module. That Module will include the Components, Directives, and Services that implement that feature.
Separation of issues is aided by the modular design. Keep the features in the same order. It's simple to maintain the code. Allows the code to be reused more easily.
Modules are the foundation of the Angular framework. The main Angular module, @angular/core, implements Angular's basic functionality, as well as low-level services and utilities.
Forms, HTTP, and Routing are implemented as independent Feature modules called FormsModule, HttpClientModule, and RoutingModule, respectively.
JavaScript Modules vs. NgModules
JavaScript Modules
The JavaScript Language includes JavaScript Modules, which are sometimes known as JS modules, ES modules, or ECMAScript modules. A file is used to hold the JS Modules. Each file has exactly one module, and each module has exactly one file. These modules are made up of little pieces of code that can be reused. They produce a value that can be imported and used by another module.
The SomeComponent is exported by the Javascript Module below.
export class SomeComponent {
   //do something
}
Another JavaScript Module that imports and uses the SomeComponent is the SomeOtherComponent.
import { SomeComponent } from './some.component';

export class SomeOtherComponent {
   /do some other thing
}
How to Create an Angular Module
ngModule
@NgModule({
  declarations: [  ],
  imports:      [  ],
  providers:    [  ],
  exports:      [  ],
  bootstrap:    [  ],
  entrycomponents: [ ]
})
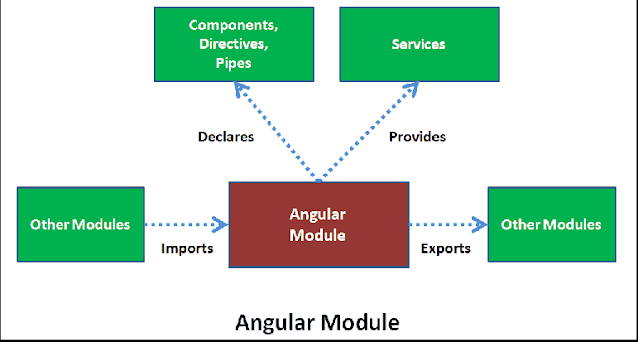
Declarations array
Providers array
- Components, Directives, and Pipes all have declarations.
- Services are provided by Providers.
- The breadth of services is global. Services added to the Providers array are injectable across the application.
Imports array
Exports array
Bootstrap
EntryComponents
- The Component Selector is located in the HTML.
- The bootstrap array declares this.
- In the root definition, it's stated.
Angular Module Example
ng new --routing --style css ModuleDemo
npm start
There are two modules in the app. AppModule and AppRoutingModule, for example.
Routing Module
import { NgModule } from '@angular/core';
import { Routes, RouterModule } from '@angular/router';

const routes: Routes = [];

@NgModule({
  imports: [RouterModule.forRoot(routes)],
  exports: [RouterModule]
})
export class AppRoutingModule { }
Root Module
import { BrowserModule } from '@angular/platform-browser';
import { NgModule } from '@angular/core';

import { AppRoutingModule } from './app-routing.module';
import { AppComponent } from './app.component';

@NgModule({
  declarations: [
    AppComponent
  ],
  imports: [
    BrowserModule,
    AppRoutingModule
  ],
  providers: [],
  bootstrap: [AppComponent]
})
export class AppModule { }
Creating a Module
Components
import { Component } from '@angular/core';

@Component({
    templateUrl: './about-us.component.html',
})
export class AboutUsComponent
{
}
Add the following code under the home/pages/aboutus/about-us.component.html file.
<h1> About Us Page</h1>


home/pages/contactus/contact-us.component.ts

import { Component } from '@angular/core';

@Component({
    templateUrl: './contact-us.component.html',
})
export class ContactUsComponent
{
}
Add the following code under the home/pages/contactus/contact-us.component.html file.
<h1> Contact Us</h1>

home/pages/home/home.component.ts

import { Component } from '@angular/core';

@Component({
    templateUrl: './home.component.html',
})
export class HomeComponent
{
}
Add the following code under the home/pages/home/home.component.html file.
<h1> Welcome To Module Demo</h1>
Add the following code under the home/pages/index.ts file.
export * from './aboutus/about-us.component';
export * from './contactus/contact-us.component';
export * from './home/home.component';
Home Module
import { NgModule } from '@angular/core';
import { RouterModule, Routes } from '@angular/router';
import { CommonModule } from '@angular/common';

import { AboutUsComponent,ContactUsComponent,HomeComponent } from './pages';

const routes: Routes = [
  {   path: '',   component: HomeComponent   },
  {   path: 'home',   component: HomeComponent   },
  {   path: 'contactus',   component: ContactUsComponent   },
  {   path: 'aboutus',   component: AboutUsComponent   },
];

@NgModule({
  declarations: [AboutUsComponent,ContactUsComponent,HomeComponent],
  imports: [
    CommonModule,
    RouterModule.forChild(routes),
  ],
  providers: [],
})
export class HomeModule { }
export * from './pages';
export * from './home.module';
Using HomeModule in AppModule
import { HomeModule} from './home';
Next, add HomeModule to the @ngModule's imports information.
imports: [
  BrowserModule,
  AppRoutingModule,
  HomeModule
],
After that, we'll use the HomeModule's Components. Add the following code to the app.component.ts file.
<ul>
  <li>
    <a class="navbar-brand" routerlink="/">Home</a>
  </li>
  <li>
      <a class="navbar-brand" routerlink="/aboutus">About</a>
  </li>
  <li>
    <a class="navbar-brand" routerlink="/contactus">Contact</a>
  </li>
</ul>

<router-outlet></router-outlet>ul {
list-style-type: none;
margin: 0;
padding: 0;
overflow: hidden;
background-color: #333333;
}
li {
float: left;
}
li a {
display: block;
color: white;
text-align: center;
padding: 16px;
text-decoration: none;
}
li a:hover {
background-color: #111111;
}

