How To Upload File Using Angular And NodeJS
In this article, we will learn how to upload a file in Angular using Node.js API. In this article, we first create an API in Node.js then use it in Angular application.
So, let's start with the implementation
To upload a file, we must first install a package.
Install the express-fileupload package using the NPM:
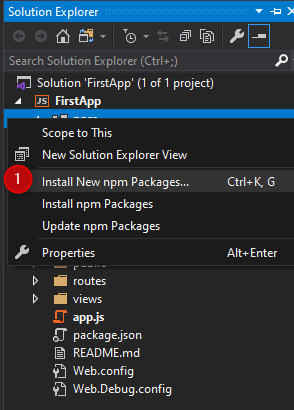
Right-click on the npm in Solution Explorer -> Install New npm Package.
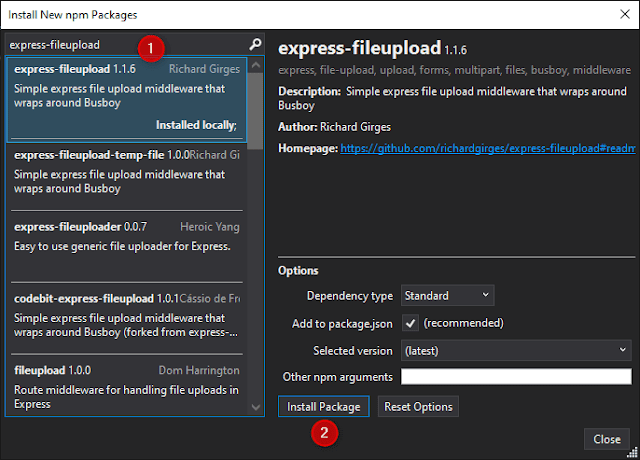
Search express-fileupload package and click on Install Package button.
Now, Open the index.js file from the routes folder and add the following code in it.
'use strict';
var express = require('express');
var router = express.Router();
var fileupload = require('express-fileupload');
var fs = require('fs');

router.use(fileupload());

/* GET home page. */
router.post('/fileupload', function (req, res) {
    if (req.files.photo == undefined || req.files.photo == null) {
        res.status(415).send();
    }
    const file = req.files.photo;
    var directory = './Uploads';
    //Create a directory if it doesn't exist
    if (!fs.existsSync(directory)) {
        fs.mkdirSync(directory);
    }
    if (file.mimetype == 'image/jpeg' || file.mimetype == 'image/png') {
        file.mv("./Uploads/" + file.name, function (error, response) {
            if (error) {
                res.status(415).send();
            }
            else {
                res.status(200).send();
            }
        });
    }
    else {
        res.status(415).send();
    }
});

module.exports = router;
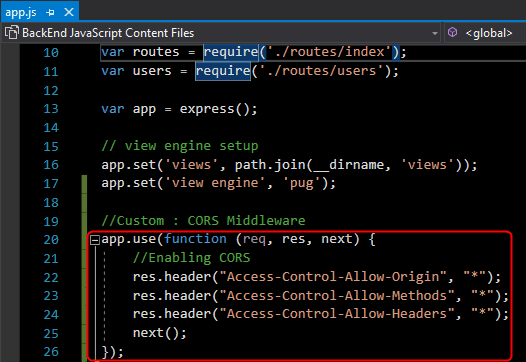
Now, add the following code for enable Cross-Origin into the app.js
'use strict';
var debug = require('debug');
var express = require('express');
var path = require('path');
var favicon = require('serve-favicon');
var logger = require('morgan');
var cookieParser = require('cookie-parser');
var bodyParser = require('body-parser');

var routes = require('./routes/index');
var users = require('./routes/users');

var app = express();

// view engine setup
app.set('views', path.join(__dirname, 'views'));
app.set('view engine', 'pug');

//Custom : CORS Middleware
app.use(function (req, res, next) {
    //Enabling CORS
    res.header("Access-Control-Allow-Origin", "*");
    res.header("Access-Control-Allow-Methods", "*");
    res.header("Access-Control-Allow-Headers", "*");
    next();
});

// uncomment after placing your favicon in /public
//app.use(favicon(__dirname + '/public/favicon.ico'));
app.use(logger('dev'));
app.use(bodyParser.json());
app.use(bodyParser.urlencoded({ extended: false }));
app.use(cookieParser());
app.use(express.static(path.join(__dirname, 'public')));

app.use('/', routes);
app.use('/users', users);

// catch 404 and forward to error handler
app.use(function (req, res, next) {
    var err = new Error('Not Found');
    err.status = 404;
    next(err);
});

// error handlers

// development error handler
// will print stacktrace
if (app.get('env') === 'development') {
    app.use(function (err, req, res, next) {
        res.status(err.status || 500);
        res.render('error', {
            message: err.message,
            error: err
        });
    });
}

// production error handler
// no stacktraces leaked to user
app.use(function (err, req, res, next) {
    res.status(err.status || 500);
    res.render('error', {
        message: err.message,
        error: {}
    });
});

app.set('port', process.env.PORT || 3000);

var server = app.listen(app.get('port'), function () {
    debug('Express server listening on port ' + server.address().port);
});
Our backend(NodeJs API) application is completed. Now we start front-end(Angular) development.
First we need to add HttpClientModule and FormsModule module into the app.module.ts file.
import { BrowserModule } from '@angular/platform-browser';
import { NgModule } from '@angular/core';

import { FormsModule } from '@angular/forms';
import { HttpClientModule } from '@angular/common/http';

import { AppRoutingModule } from './app-routing.module';
import { AppComponent } from './app.component';

@NgModule({
  declarations: [
    AppComponent
  ],
  imports: [
    BrowserModule,
    AppRoutingModule,
    FormsModule,
    HttpClientModule
  ],
  providers: [],
  bootstrap: [AppComponent]
})
export class AppModule { }
Now, add the following code under the app.component.ts file.
import { Component } from '@angular/core';
import { HttpClient } from '@angular/common/http';

@Component({
  selector: 'app-root',
  templateUrl: './app.component.html',
  styleUrls: ['./app.component.css']
})
export class AppComponent {
  title = 'FrontEnd';
  formData = new FormData();

  constructor(private http: HttpClient) { }

  onSubmit() {
    return this.http.post('http://localhost:1337/fileupload', this.formData).subscribe(
      (response) => {
        alert('File Uploaded Successfully')
      },
      (error) => {
        alert('Something Went Wrong !!!')
      }
    );
  }
  handleImage(files: FileList) {
    this.formData.delete('photo');
    this.formData.append('photo', files[0]);
  }
}
Now, using the following code add the owl-carousel component under the app.component.html file.
<form (ngSubmit)="onSubmit()">
  <input type="file" (change)="handleImage($event.target.files)" accept=".jpeg,.png,.jpg">
  <input type="submit">
</form>
Now, run the application using the ng serve command into the terminal and see the browser screen we are able to browse file and easily upload on server using the NodeJS API.
Conclusion
In this article, we learned how to upload a file in Angular application using NodeJs API.
I hope this article helps you and you will like it.👍
Please give your valuable feedback and comments or suggestion in the comment section
If you have any doubt or confusion then free to ask in the comment section.


